
Add a touch of nostalgia without a lot of drama when you make your own version of our DIY One Pallet Bench Swings! Create a beautiful area to enjoy the outdoors, your patio, or garden area, or as amazing party decor! And, you only need one pallet or LESS! Want to add a place to relax or a fun area for the kids? Maybe you want a place to have a little romance? You can do it all with just a single pallet! If you have more, then you can get even more creative!
Get into the DIY One Pallet Bench Swings of things with these planning tips:
1. DETERMINE THE SWING SPACE:
- BEHIND: You should have at least 30” of space BEHIND the swing at a minimum. 36” or more is PREFERRED.
- SIDES: Additionally, you should have around 14-18” of space on either side of the swing. Just remember how you used a swing when you were a kid!

The swing is stunning, but there’s no room to move! If you swing back, you’ll hit the wall or even the window!
2. HANGER DISTANCE:
- Whether you use rope or chain, your mounting points to hang the swing should be at a minimum of 2” wider, but up to 4” wider than your swing width.
- If you have a 24” swing, your hanging points should be spaced at least 26” to 28” apart.
- This spreads the weight evenly and prevents the rope or chain from rubbing against the swing itself.
- There are also ways to make the swing more comfortable, such as swing hanging kits that incorporate springs, like this one at The Porch Swing Company.

A springy porch swing hanging kit provides a more comfy swing time!
3. WHERE TO HANG THE DIY One Pallet Swings?
- Use STRUCTURAL pieces! You want to use a joist. These are the horizontal beams that support the ceiling. They’re usually 2” x 6” or bigger, and may be 4” x 4” posts or larger as well.

- If you ONLY have 2×4” joists, STOP and go to step #4
- Go up into the attic and look at the joists, and general arrangement.
- If you can’t get into the attic, you can remove some of the ceiling trim OR use a stud finder.

- If you don’t have a stud finder or other means of seeing the joists, you can drill very small holes to confirm the location on each side of the joist. This will tell you how wide it is. Then all you have to do is to mark both side edges to find the center to install the anchor.
4. I DON’T HAVE BIG ENOUGH JOISTS! WHAT CAN I DO?
OPTION ONE:
- Install short beams, such as a 4” x 4” post across the tops of multiple joists.
- Cut two 4×4″ beams, so they’re long enough to span across three or more joists, and run them perpendicular.

- You can use one 4×4” post for children’s swings; just follow the hanger distance rules in step #2 and use a post long enough to provide adequate support:
- You can bolt the 4×4” beams in place (pre-drill first!)
- Or, you can run wood screws through the sides of the 4×4” beams at angles – toe-nailing them into place.

Toe-nailing a board in place.
OPTION TWO:
Install 4×4″ posts between the joists – by using joist hangers.

Joist Hangers. Be sure to use a nail or screw in every hole!
- Sometimes it’s easier to install a joist hanger by using a scrap piece of the board you’re going to hang so you can align to the bottom of the joist and also squeeze the joist hanger around the scrap to fit snugly.
- Install the 4×4” posts flush with the bottom of the joists.
- When using joists, the hangers will face each other.
- Be sure to use the proper joist hanger installation hardware as they frequently use specialty 1 ½” nails or screws.
- Some joist hangers have little prongs to speed-set the joist. You can tap them in with the hammer to hold them in place temporarily until you set all the nails (or screws).
- Don’t reuse old joist hangers.
- Don’t use the wrong size and bend over the extras. Both situations can lower the load capacity.
- Cut the blocks to fit snugly between the joists, and fit them down into the joist hangers. Secure them with hanger nails or screws.
- The advantages of using joist hangers vs. just nailing through the beams into the new posts you’re adding are that the joist hangers allow for expansion and contraction of the wood, so they shouldn’t loosen over time like nails can. Just think of an old fence and how the boards get loose and wiggly – that’s what can happen!
- Now, install eye bolts or eye screws and attach your chain or rope.
- Be sure you use the right size eye bolts – now is not the time to skimp on a couple of dollars.
- They should be at least ½” diameter, with enough length that you can secure a nut with washers and still have some threads showing.
- PRE-DRILL before installing your eye bolts/screws. This will reduce the risk of splitting the board.
NOTE: If hanging a swing from a tree, you can help protect the branch by covering the chain or rope in a piece of rubber hose that you slide over the chain/rope.
Ready to build? Here are some ideas for some terrific DIY One Pallet Bench Swings
This Super-simple Deck Board Swing: All you need is one sturdy deck board and some quality rope or chain.

The traditional, easy-to-make, and super-fun single pallet board swing!
- Cut a deck board to a comfortable seat width (approximately 26 to 30” wide) and sand all surfaces well to protect little tushies.
- Drill two holes approximately 2” from each corner large enough to accommodate a thick, sturdy rope.
- Cut two lengths of rope and find a safe, sturdy support, such as a large branch, porch beam, or upcycle an old swing set frame.
- Secure the rope ends around the support structure, and then run the opposite ends through the holes on the board, running it into one corner, then lacing it back up through the other corner and tying it with large knots to secure.
- If you use a chain, use a minimum of ½” eye bolts, wide washers on top and the bottom side, and nuts to secure. Use S-hooks or Quick Links (the D-shaped links with the built-in nuts).

Here’s a Quick Link!
Another simple swing that’ll thrill the kids (or grandkids)! Make your outdoor area, garden, or even porch a bit more magical with these DIY One Pallet Bench Swings!

This swing is great! Find a wide pallet board, cut a circle, drill a hole in the center and tie a knot! You’re ready to have fun!

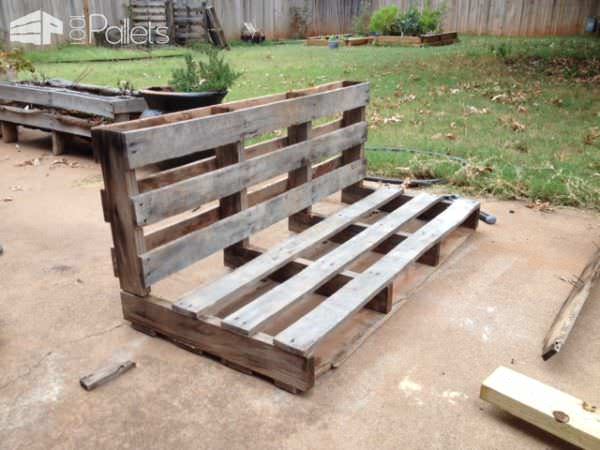
This version of our DIY One Pallet Swings is very easy for almost anyone!
- First, cut a pallet in half lengthwise.
- Second, remove the lower deck boards on one-half, but leave the end piece with the pallet blocks in place.
- Next, mount the half of the pallet that you removed part of the deck from perpendicular to the other piece. Secure well with outdoor wood screws.
- Cut two deck boards at angles and mount from the front corner of the seat to a safe spot on the backrest; secure with screws.
- Use remaining boards to cap off the front of the seat and along the top of the backrest. Use chain, quick links, and bolts to secure the seat – mounted into the pallet blocks.
Here’s another one of our bench swings. You’ll need a full-sized pallet (not a Euro pallet or “EPAL”) for this version.

Another view of how to turn one large pallet into one of our DIY One Pallet Bench Swings. In this version, the crafter cut half-lap joints on the stringers and secured together. Bolts and glue are suggested to make the bench durable. Additionally, you can add metal brackets, or extra deck boards across the joint areas to secure tightly.

This is not QUITE a One Pallet Bench Swing, but it was too beautiful to leave out! This one was made from about two pallets. First, break down the pallets. Next, build a seat frame using the stringers, and cover with deck boards. Make a seat back frame, leaving the left and right stringers longer to mount to the seat. Add diagonal cross-bracing from the outer corner of the seat to the seat back. Secure with rope or chain through the stringer boards.
How about a single-pallet swinging bed for stargazing? Yup, you can do that too! Add some romance with our DIY One Pallet Bench Swings!

You only need to install eye bolts into the four corner pallet blocks and secure!
Do a little yard equipment repurposing while you’re at it with this Upcycled Swing Set and single-pallet bench swing!
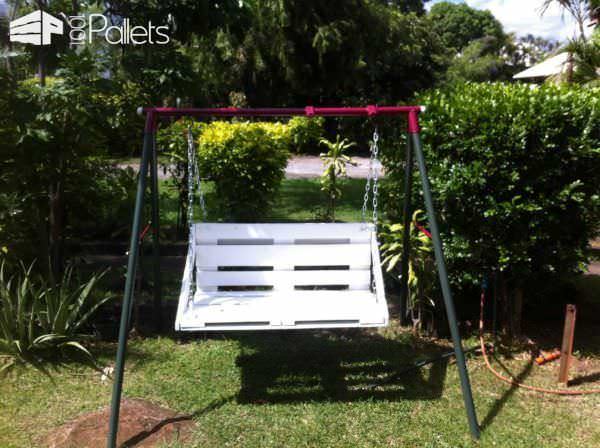
Something for the kids!
This little swing only needs a part of a pallet. Great for the grandkids when they come over to visit or even a pet’s lounge spot!

If you’ve got two pallets, you can create a bigger bench like this! Springtime fun with our DIY One Pallet Bench Swings!

Or this version of our Two-Pallet Swings:


This beautiful two-pallet bench was a gift for a mother-in-law. Lucky her!

Now that you’re feeling confident consider adding a stylish backrest like this beautiful Pallet Swing Chair!

Or go all-out and build your own A-frame to hold a beautiful pallet swing! The ultimate DIY One Pallet Bench Swings Idea!

So what are you waiting for? Turn the computer off, pick up those tools and start building one of these fantastic DIY One Pallet Bench Swings! You know you want to… Don’t forget to submit your creation to us. If you build it, we’ll post it! Happy Palleting from the 1001pallets.com crew!
Read Easy DIY Tutorial: Build & Install One Pallet Bench Swings by HeatherStiletto on 1001 Pallets!